How To Tint Brows At Home - For A Fresh Look
Giving your brows a little color boost at home can make a real difference in how you look each day. It’s a way to add definition and shape, making your face appear more put together without needing makeup all the time. Many people find that a bit of brow color helps frame their eyes, giving a brighter and more open appearance. It is, in some respects, a simple change that can bring a lot of joy to your morning routine.
This idea of adding a touch of color to your brows is actually pretty popular, and for good reason. It helps fill in sparser areas and makes your natural brow hairs stand out more. You might find that your brows, which seem light or barely there, suddenly have a presence you did not know was possible. So, it's almost like discovering a new part of your own face, ready to be shown off.
Learning how to tint brows at home means you can get that polished appearance whenever you wish, all from the comfort of your own space. It saves you trips out and about, and you can pick the exact shade that works best for your hair and skin. This guide will walk you through the steps, helping you feel sure about trying it yourself.
- Discovering The Multitalented Max Minghella An Artistic Journey
- Houses For Sale In Iran
- Net Worth Of Jojo Siwa
- Timothy Olyphant A Multifaceted Talent In Hollywood
- Pok%C3%A9mon Odyssey
Table of Contents
- Getting Ready for Brow Color at Home?
- Picking the Right Color
- Is Home Brow Color Safe for Everyone?
- The Steps to Beautiful Brows
- What Happens After You Color Your Brows?
- Keeping Your Brow Color Looking Good
- When Should You Seek Help from a Pro?
- Common Questions About Brow Color
Getting Ready for Brow Color at Home?
Before you start putting any color on your brows, it is a good idea to gather everything you will need. Having all your items laid out makes the whole process smoother and helps you stay focused. You do not want to be running around looking for something once you have started mixing things up. Basically, a little bit of preparation goes a long way here.
What you'll need for how to tint brows at home
First, you will need a brow color kit. These kits usually come with a color cream and a developer liquid. Make sure the kit is made for brows and not for hair on your head, as the formulas are quite different. You will also want a small dish for mixing, and a little brush or spoolie to put the color on your brows.
To keep your skin safe, get some petroleum jelly or a thick cream. This will go around your brows to stop the color from getting on your skin. Cotton swabs or cotton pads are also very useful for cleaning up any stray marks. You might also want some disposable gloves to keep your hands clean.
- Unistar Two Babies One Fox
- How Much Is A House In Iran
- Froot Vtuber Cheating
- Daisys Destruction
- Riley Green Political Party
A timer is pretty important, too. You will need to keep track of how long the color stays on your brows. A small mirror, perhaps one that makes things look bigger, can help you see what you are doing more clearly. Having good light in the room where you work is also something to think about.
Finally, a gentle cleanser or makeup remover will be helpful for cleaning your brows before you start. This makes sure there is no oil or makeup that could stop the color from working well. Really, having all these items ready makes the whole experience much easier and more pleasant.
Picking the Right Color
Choosing the correct shade for your brows is a big part of getting a look you will be happy with. You want the color to blend in with your natural hair color, but also give your brows a bit more presence. It is not about making them a completely different color, but rather deepening what is already there. Often, people pick a shade that is just a touch darker than their natural brow hair.
Choosing your shade for how to tint brows at home
If you have very light hair, say blonde or light brown, you might want to go for a light brown or ash brown color. This will give definition without looking too harsh. For those with medium brown hair, a medium brown or a slightly darker brown often works well. People with darker hair, like dark brown or black, can usually use a dark brown or black color, but still be careful not to pick something that looks too strong.
Think about your skin tone, too. Someone with very pale skin might find a very dark brow color looks a little too much. It is often a good idea to pick a shade that is one or two steps lighter than your head hair, especially if your head hair is very dark. This keeps things looking natural and soft.
When you are looking at the color options, remember that the color on the box might look a bit different on your brows. It is always better to start with a lighter shade, as you can always make them darker later if you wish. You cannot really make them lighter once the color is on. This step is, arguably, one of the most important for a good outcome.
Is Home Brow Color Safe for Everyone?
Before you put any color product on your face, it is really important to check if your skin will react badly to it. Some people have sensitivities to certain ingredients found in color products. This check is a simple step that can help you avoid a lot of trouble later on. It is, basically, a safety measure you should not skip.
Patch testing for how to tint brows at home
A patch test means putting a very small amount of the mixed color product on a tiny spot of skin, usually behind your ear or on your inner arm. You mix a little bit of the color cream and developer, just like you would for your brows. Then, you dab a tiny bit onto the skin area.
Leave that small dab of color on your skin for the amount of time the kit instructions say, or even a little longer, like 24 to 48 hours. During this time, watch the area for any signs of redness, itching, swelling, or any kind of discomfort. If you see any of these things, it means you have a reaction, and you should not use that product on your brows.
If your skin looks and feels fine after the test period, then you are probably okay to go ahead with coloring your brows. This step might seem like a bit of extra work, but it is very important for your skin's well-being. Skipping it could lead to skin problems that are not fun at all.
Remember, even if you have used a product before, it is still a good idea to do a patch test every so often, especially if you get a new box or if it has been a long time since your last use. Sometimes, product formulas can change, or your own skin might become more sensitive.
The Steps to Beautiful Brows
Once you have picked your color and done your patch test, you are ready to start the actual coloring process. Take your time with each step. Rushing can lead to mistakes, and you want your brows to look just right. This part is where you bring your plans to life, so to speak.
A step-by-step guide for how to tint brows at home
First, clean your brows very well. Use a gentle cleanser to remove any makeup, oils, or dirt. Your brows should be completely dry before you move on. This helps the color stick to your hairs better.
Next, put a thin layer of petroleum jelly or thick cream around the skin area surrounding your brows. Be careful not to get any on the brow hairs themselves, as this will stop the color from taking. This acts like a shield for your skin.
Now, mix the color cream and developer in your small dish. Follow the instructions that come with your kit very closely for the right amounts. Mix it until it is a smooth, even paste.
Using the small brush or spoolie, carefully put the color mixture onto your brow hairs. Start from the inner part of your brow and work your way out. Make sure all the hairs are covered, from the root to the tip. You want a good, even layer of color.
If you get any color on your skin outside the brow area, wipe it off right away with a cotton swab. The sooner you wipe it, the less likely it is to leave a mark.
Set your timer for the amount of time suggested in your kit's instructions. This is usually somewhere between 5 and 10 minutes. Do not leave the color on for longer than the suggested time, as it could make your brows too dark or cause irritation.
When the timer goes off, gently wipe off the color with a damp cotton pad or a wet washcloth. Make sure to get all the color off. You might need to rinse your brows a few times with cool water until the water runs clear.
Look at your brows in the mirror. If they are not as dark as you wanted, you can repeat the process, but only leave the color on for a very short time, perhaps 1-2 minutes, to add a little more depth. However, it is usually better to start lighter.
What Happens After You Color Your Brows?
Right after you color your brows, they might look a bit darker than you expected. This is pretty normal. The color often settles in over the next few hours, and some of the initial very dark look will fade a little. You might also notice a slight redness around your brow area, but this should go away quickly.
The new color will likely make your brows stand out more, giving them a fuller and more defined shape. This is what most people are aiming for. You might find you need less brow makeup, or even none at all, for a while.
The color usually lasts for a few weeks, typically somewhere between two to four weeks. How long it stays depends on a few things, like how often you wash your face, the type of products you use, and how quickly your brow hairs grow and fall out. As your brow hairs naturally shed, the color will go with them.
You will see the color slowly become lighter over time. This is a gradual process, so your brows will not suddenly look faded. You will just notice they are not as bold as they were right after coloring.
Keeping Your Brow Color Looking Good
To make your brow color last as long as it can, there are a few simple things you can do. These steps help protect the color from fading too quickly. It is all about being a little gentle with your brows.
Aftercare tips for how to tint brows at home
Try not to scrub your brows too hard when you wash your face. A gentle washing motion is usually enough to clean them without rubbing away the color.
Some face washes or makeup removers can make the color fade faster. Products with oils or strong cleansers might be culprits. If you notice your brow color fading quickly, you might want to switch to gentler, oil-free products for your face.
Spending a lot of time in the sun can also make your brow color fade. If you are going to be outside for a long time, consider wearing a hat or using a brow product with some sun protection. This is, in a way, like protecting your hair color from the sun.
Do not color your brows too often. Giving them a break between coloring sessions is good. Waiting until the color has faded quite a bit, perhaps every three to four weeks, is a good general rule. Over-coloring can sometimes make the hairs a little brittle.
Keeping your brows moisturized can also help them stay healthy, which in turn can help the color look good. A tiny bit of brow oil or even a light facial moisturizer can work.
When Should You Seek Help from a Pro?
While coloring your brows at home can be very simple and give good results, there are times when it might be better to go to someone who does this for a living. Knowing when to get professional help is a smart move for your brow health and your look.
If you have very sensitive skin, even after a patch test, you might find that your skin reacts to home kits. A professional might have access to different kinds of products or techniques that are gentler. They can also watch for any signs of irritation as they work.
If you are not sure about picking the right color, a pro can help you choose a shade that truly suits your hair and skin. They have a lot of experience seeing different brow colors on different people. They can also give you advice on what will look most natural.
Sometimes, people want a very specific brow shape or a very precise color placement. A professional has the tools and the steady hand to do very detailed work that might be hard to achieve on your own. They can make sure your brows are perfectly even.
If you have had any bad reactions in the past, or if you are just feeling a little nervous about doing it yourself, there is nothing wrong with letting a pro handle it. They are trained to do this safely and well. It is, basically, about feeling comfortable and confident with the outcome.
Common Questions About Brow Color
Many people have similar questions when they think about coloring their brows at home. Here are some answers to common thoughts that might come up.
**Can I use regular hair dye on my brows?** No, you should not. Hair dye for your head is much stronger and can cause serious harm if it gets into your eyes or on the delicate skin around your brows. Brow color kits are made specifically for this area.
**Will my brows look fake or too dark?** If you pick the right shade and follow the timing instructions, your brows should look natural and simply more defined. Starting with a lighter shade and leaving it on for a shorter time can help prevent them from looking too dark. You can always add more color if needed.
**What if I do not like the color?** The color will fade over time. You can try to speed up the fading process a little by gently washing your brows more often with a regular cleanser. However, it is best to let it fade naturally rather than trying to remove it with harsh products.
**How often can I color my brows?** It is usually suggested to wait at least 3-4 weeks between coloring sessions. This gives your brows time to rest and allows the previous color to fade naturally. Coloring too often can lead to dryness or damage to the brow hairs.
**Will coloring my brows make them grow more?** No, coloring does not affect hair growth. It only changes the color of the hairs you already have. If you are looking for brow growth, you would need to use specific growth serums.
**What if I get the color in my eye?** If you get any color product in your eye, rinse it out right away with a lot of cool, clean water for several minutes. If irritation continues, seek medical help. This is why being careful and having cotton swabs ready is very important.
**Can I color my brows if they are very thin?** Yes, coloring thin brows can actually make them appear fuller and more present. The color makes the finer, lighter hairs more visible, giving the look of more brow hair. It is a really good way to add a bit of volume without drawing them on every day.
This guide has walked through getting ready, picking your color, testing for safety, and the steps for coloring your brows at home. It also covered what to expect after, how to keep your color looking good, when to see a professional, and answers to common questions.
- Aishah Sofey Leak Free
- Joe Pesci Health A Comprehensive Look At The Iconic Actors Wellbeing
- Lol Superman Explained
- Which Country Colonized Iran
- Emily Campagno
How to Tint Your Brows at Home - XOXOKAYMO
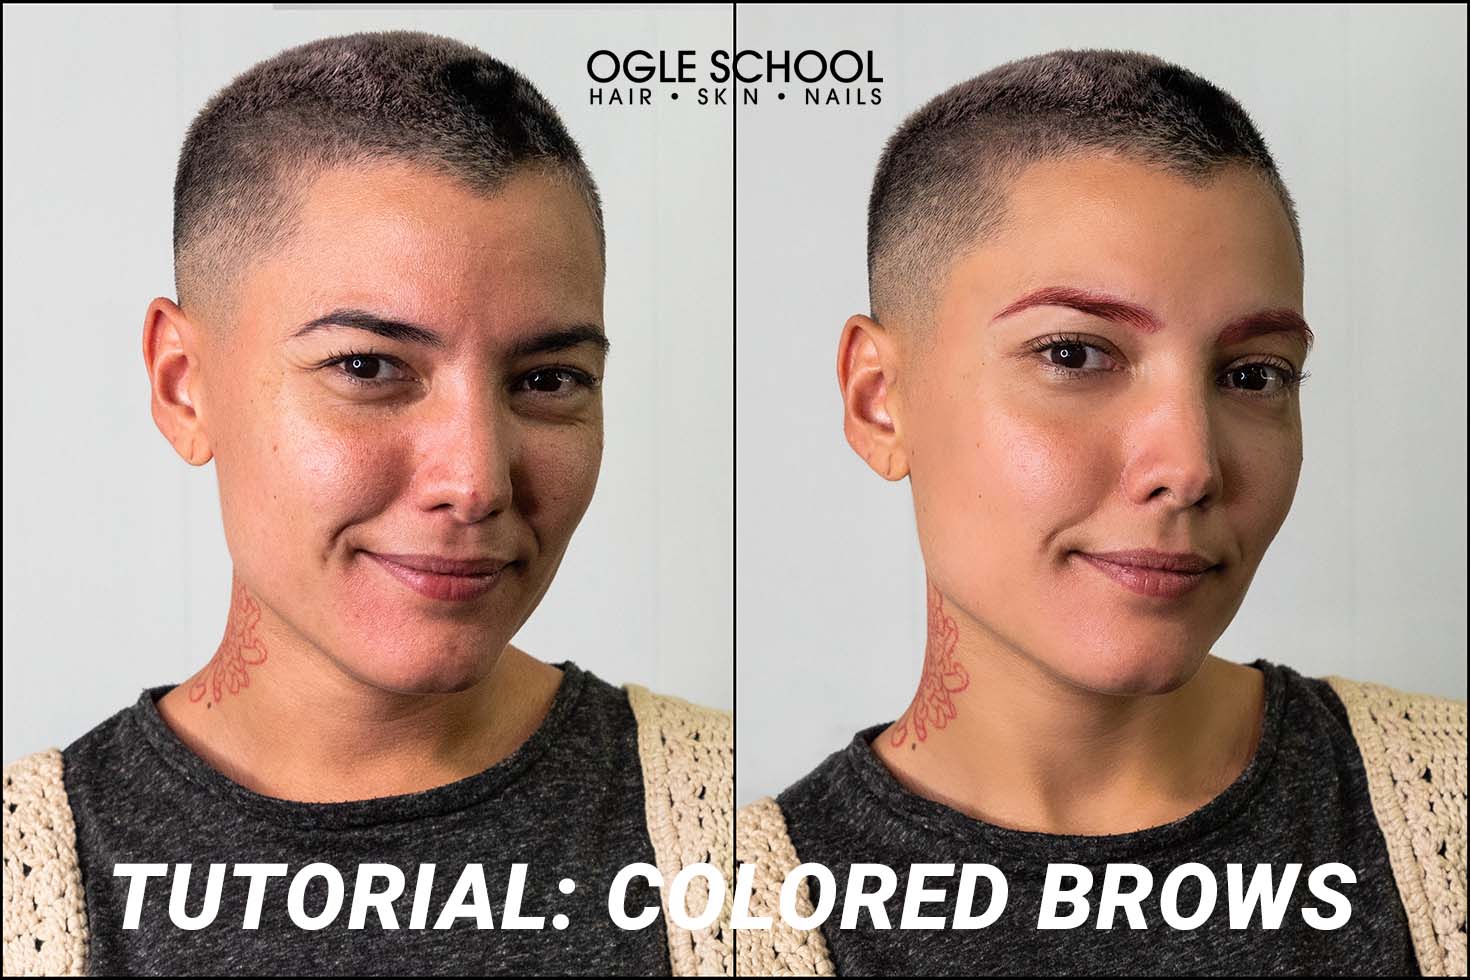
How To Tint Your Brows: A Tutorial | Ogle School
:max_bytes(150000):strip_icc()/Stocksy_txpa685f4f91Pp300_Medium_5412901-85c8da5bd912496db7530e23e2908f2e.jpg)
How to Use Beard Dye to Tint Your Brows, from Pros
